05
2018Web Sharpener Panel – Better Sharpening for the Web
Introduction
For many of us the internet has become the main portal for the presentation of our images. Unfortunately the necessary downsizing results in a loss of details and clarity of the original. To preserve some of these details an efficient workflow is required, that surpasses the default algorithms used in Photoshop.
Over the years I’ve looked for better methods and created a more and more refined process for downsizing my images. First I used Photoshop actions to accomplish the task but I wanted more flexibility and so I wrote a script to make this possible. Now my web images look more detailed and closer to what I’ve got in the original shot.
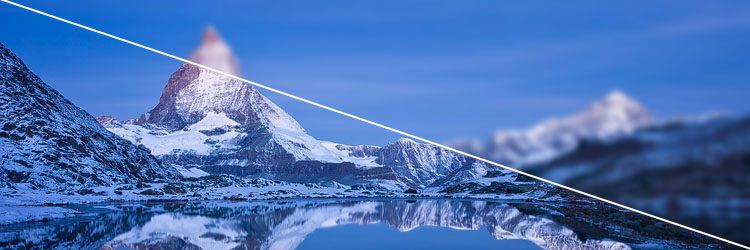
It’s nice to talk about things but seeing the result is even better. Look at this comparison between the downsizing done by Photoshop (on the left) and the version I created by using my script (on the right). You can move the slider in the middle of the image to switch between the versions.
Photoshop (left) – Web Sharpener Script (right)

Requirements
Photoshop CC2014 or higher (Windows or MacOS)
The Panel
![]()
In Detail – Header

The header shows you the title and the version of the extension. When you click the red button on the left, my website opens up in your browser. The script and extension have always been free and always will be. However, if you appreciate the work that I did, feel free to click on the Paypal icon on the right and donate as much as want. Any support is appreciated.
In Detail – Presets

There are a lot of settings that you can adjust in the panel. If you want to save them, you can create a preset to access them again later.
The Dropdown List
In the dropdown list all the available presets are listed. The extension comes with a few predefined presets. Feel free to try them out. The preset „Default“ should be fine for most cases and is a good configuration to base your own presets on.
The Update Button
By clicking the Update button, the active preset will be overwritten with the current settings. In the beginning you might want to adjust the „Default“ preset with your own settings (like a different size, watermark etc.).
The Reset Button
If you want to revert the settings to the last saved state of the active preset, click the Reset button.
The Delete Button
To remove a preset from the list, you can hit the Delete button. After confirming your decision, the preset will be removed from the list and the configuration file.
The Add Preset Button
Whenever you want to create a new preset based on the current settings, you can hit the Add Preset button. The preset will be added to the bottom of the dropdown list. At the moment the list can’t be rearranged, but you will find a description on how to edit the settings file further down on this page.
In Detail – Main Settings

This section contains the most important and most used settings of the extension. Remember – you can always create a separate preset (see above) if you use a certain combination of settings rather often.
Final Size and Orientation
The Final Size value defines the final size of your sharpened image in pixels. Next to it you can decide which dimension of the image this value applies to. You can focus on the orientation of the image by either defining the Longer Side or the Shorter Side of the final image. If you want to restrict the Width or Height of the image, choose one of the other two options. For example in Instagram a height of 1350px is recommended. So just enter 1350px as the dimension and select the option Height.
Duplicate Image
When this option is checked, the original image will be duplicated before the sharpening starts. In doing so, the original image will be preserved.
Create Edge Mask
When sharpening an image you usually get oversharpened edges in areas of high contrast. To prevent this from happening, the script can create an edge mask to exclude this areas from being sharpened. In most cases this works well and the option should be checked. You can always deactivate or adjust the mask in the sharpened version anyway.
Mask Paint Mode
The final image is separated into individually sharpened layers for a more precise control of the outcome. The strength of these layers is controlled by their opacity value (see next section). However, if you want to control the distribution of the sharpening more precisely, the transparency can be controlled by the brightness of the mask instead. In that case the opacity of the layer will be set to 100% but the mask will show a gray value corresponding to the opacity of the layer. You can now paint inside that mask with white/black to increase/decrease the amount of sharpening.
To 8Bit & sRGB
If the final image is intended for the internet it’s recommended to convert it to a depth of 8 Bit and the sRGB color space before saving. If this box is checked, the script will take care of that for you. Otherwise you will have to address the conversion on your own after the sharpening.
Layer Opacity – Basic/Details
For a more precise control, the sharpening effect is split into a few layers. As their full effect would be way to strong, their strength is controlled by an opacity value. In this section you can define these values.
The „Basic“ layers contain a more straightforward and contrasty sharpening effect, while the „Details“ layers show a more textured and noisy sharpening effect. They again are split into a „Lighten“ and „Darken“ layer group. „Lighten“ controls the bright details of the image (like bright leaves, stars etc.) while „Darken“ takes care of the darker details of the image (typically dark details in front of brighter ones – like dark branches in front of a bright sky).
Layer Opacity – Compensations
Because of the details and noise introduced by the sharpening, the final image can lose a bit of saturation and contrast. There are two layers that compensate for that loss. Their strength can be controlled by these values.
In Detail – Watermark

Most of us like to put a watermark on their images. This section can automate that process for you. If you want to use a watermark with transparent areas, it’s best to save it in a format that supports that (like PSD, TIFF or PNG). If you want to offset the watermark from the border of the image, you will have include that offset in the watermark file.
Show Watermark
If you want to the watermark file to be loaded and placed in your final image, check this box.
Select Watermark File
Click this button to open a dialog where you can select your watermark file. If you use that watermark most of the time, you can update the Default preset to remember this file for the future.
Watermark Opacity
This sliders controls the opacity of the watermark layer.
Position Grid
On the right side of this section you can see a grid that lets you specify the position of the watermark. Just click on one of the nine available positions. Remember – the offset from the border has to be included in the watermark file.
In Detail – Expert Settings
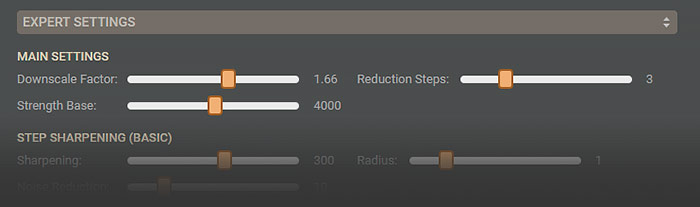
This section is hidden by default to keep the interface shorter. You can expand/collapse it by clicking on the double arrow on the right side of the section bar. If you feel that your sharpening is almost perfect and you can’t get the expected result by playing with the layer opacities in the Main Settings section, you can adjust the sharpening process a bit more precise here. These changes can be saved alongside the other settings of the preset.
Downscale Factor
Throughout the sharpening process, the image is scaled down in several steps. Each time the image is reduced by a specific ratio, which can be defined here. So if the value is „1.66“ the image will 1.66 times smaller after each reduction.
Reduction Steps
The number of reduction steps used for the final image can be defined here. The smaller your original image is, the less steps should be used. Sometimes you might even want to lower the Downscale Factor as well.
Strength Base
This is a representative value that defines the overall strength of the sharpening used in the individual steps. The higher this value is, the stronger the sharpening will be.
Step/Final Sharpening
For the sharpening, the Smart Sharpen algorithm of Photoshop is used. The Sharpening value corresponds to the Amount value in the Smart Sharpen dialog. Radius corresponds to the value of the same name in this dialog, while Noise Reduction represents the Reduce Noise value.
Edge Mask
These sliders control the creation of the edge mask that is used to prevent the oversharpening of the edges. Detection Blur is the blur radius that is used to soften the base image of the edge mask. Lower values will result in thinner, sharper lines in the mask while bigger values will create thicker lines. When changing this value, you will also have to adjust the other three sliders to get the best result. Edge Gamma, Edge Black Point and Edge White Point are Level dialog settings to define the final look and contrast of the edges.
Start Sharpening (Active Image)

Pressing this button closes the panel and starts the downscaling/sharpening process for the currently selected image.
Sharpening of Multiple Images (Batch Sharpening)
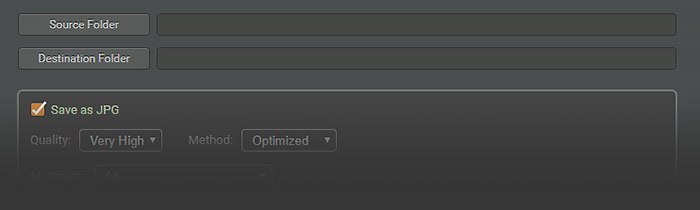
If you want to sharpen a folder filled with images, you can do it here in the lower part of the panel. The settings that will be used are the same that would be used to sharpen a single image. The settings of this sections are not saved in the presets however.
Source/Destination Folder
Select the folders where the original images are located and where you want the results to be saved.
Save As …
You have a few options for the output file formats. You can have multiple formats selected at the same time if you want to. The settings for each of the formats correspond to the settings that Photoshop uses for the individual file formats.
Start Sharpening (Multiple Images)

You can start the batch process by hitting this button. Depending on the amount and size of the original images this can take a while and Photoshop will not be responsive during the process.
The Layers of the Sharpened Image
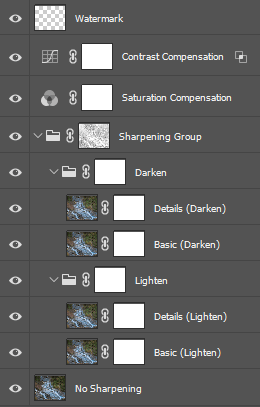
Layer Structure
After the script has finished, the downsized and sharpened image contains several layers which allow further adjustments. Here’s a little more information about their purpose.
Layer „No Sharpening“
You can find the unsharpened version of the image here.
Group „Sharpening Group“
This group of layers contains all the layers that contribute to the sharpening. If you had the option „Create Edge Mask“ checked, the edge mask is applied to the layer group. If needed you can further refine this mask or switch it on and off by SHIFT-clicking on the mask thumbnail.
Group „Darken“
This group is responsible for the sharpening of the dark details of the image. This can be examined best with branches or grass in front of a brighter background. If the result appears to be too strong, you could lower the opacity of the group or paint into the mask of the group with a dark brush.
Group „Lighten“
This one is similar to the „Darken“ group, except that it takes care of the brighter details in the image. A good example for this are blond hair in front of a dark studio background or snow-covered branches in front of a blue sky. Again the effect can be adjusted by changing the group opacity or modifying the mask of the group.
The „Basic“ Layers
In either of the groups „Darken“ and „Lighten“ you will find a layer named „Basic (…)“. This layer contains the main sharpening effect which affects the bolder details of the image. You can adjust the effect by changing the layer opacity or the mask. In case you had the „Mask Paint Mode“ option checked, the transparency of the layer is controlled by the brightness of the mask instead of the layer opacity value. You can further refine the strength of sharpening by painting directly inside mask. Painting in black lowers the effect, painting in white creates a stronger sharpening in that area.
The „Details“ Layers
Unlike the „Basic (…)“ layers, the „Details (…)“ layers control the sharpening of the finer details. This will enhance textures like rocks, distant forests and so on. If you go too far here you might increase noise and moiré – so be careful. The effect can once again be adjusted by the layer opacity or the content of the mask.
Saturation Compensation
This layer can help to restore some of the lost saturation due to the details and noise that are introduced by the sharpening. The strength of the layer can be adjusted by the layer opacity or the mask.
Contrast Compensation
Similar to the loss of saturation, a loss of contrast is possible. Use this layer to compensate for that. Again the strength of the layer can be adjusted by the layer opacity or the mask.
Watermark
This one is created if you had the option „Show Watermark“ checked in the script dialog.
The Preset File – WebSharpener_Settings.xml
All your presets are stored in an XML-file called „WebSharpener_Settings.xml“. This file is located in the Documents folder of your system (usually \Users\[USERNAME]\Documents\). In most cases you would not want to edit this file. But let’s say that you want to change the order of your presets (which is not possible from within the panel itself). You can do this manually by using a text editor (like Notepad or Notepad++).
Here’s how the file is structured:
Every layer of information has a start tag and an end tag. They look like this – „<...>“ and „</...>“. So the top layer that contains all the presets starts with „<presets>“ and ends with „</presets>“. The layer below contains the individual presets themselves. They each start with „<preset name=“[NAME]“>“ and end with „</preset>“. One layer below you will find all the individual parameters that belong to each preset. Again you can see, that they start and end with a properly named tag. Visually the individual layers are separated by progressing indents.
How to rearrange the presets:
So if you want to move a preset within the list, you need to cut the whole preset from its old position and paste it into the new location. You need to start the marking before „<preset name=“[NAME]“>“ and end it after „</preset>„. Press CTRL+X (and eventually delete empty lines that might be left by the cutting) go to the place where you want to paste the preset into (place the cursor after some „</preset>“ and hit ENTER) and paste it.
After you’ve done all that, you might want to clean the file up so it’s as neat as it was before (remove empty lines and check all the indents).


Download the Extension
To download the extension, click the following button.
Older Script Version
If you use a Photoshop version prior to CC 2014 you can try the older script version of the Web Sharpener. Just click on the button below to go to the old site of the script.
Support
As you can imagine, the creation and support for the extension takes some time. If you use and like what I did here you can support the development of the extension by donating as much as you find appropriate to my Paypal account. To do this, just click on one of the buttons below.
Dan Dill
Is it possible that you have the Photoshop/Web Sharpener labels swtiched? On my Eizo ColorEdge CG210 the Photoshop version looks much more vibrant.
I hope I am not misunderstanding.
Andreas Resch
There shouldn’t be any noticeable difference in vibrance. It’s about the sharpening here. I checked the labels and they are fine. Maybe you can clarify what the problem is.
Thanks.
kian Tavakoli
Thank you so much Andreas for your English version Tutorial.that was very usefull for me, I hope to see more Eng 🙂
Martin
Andreas,
does your web sharpener work with Photoshop Elements?
Andreas Resch
Unfortunately not.
Sandip Gupta
Very useful script and action Andreas, thank you for sharing
Eddie
Andreas is this possible with adobe Photoshop 7? i couldnt find the Preset\Scripts and Preset\Action in the installation folder…
Andreas Resch
You need at least Photoshop CS4 for the latest version of the script.
Matus
This is awesome, thanks!
Aleksander Austad
I am using your old version of your script, Version 8. I’m very satisfied with the script, but have a question for you. Maybe you can give me a good answer, or some help. I usually use the basic settings that are in your script, and the size of the image is 700×467. Sometimes I feel the image may look some „cartoonish“, or over-sharpen… It looks like it is in „Lighten“ so I use to set a lower Opacity. Your settings are the 35%. What do you recommend me to do, or what settings would you go for on an image of this size? Maybe I should change some settings when I start the script as well, or…? I like to keep my images realistic and authentic. This is very important for me, throughout the post process, but I simply want a sharp and good image for web presentation. Maybe you can help me out here 🙂
Cheers,
Alex
Andreas Resch
Sent you an email.
Wie
thanks so much for your effort making this action!
Philip L Jackson
Hi
I do not do much web work but when I do I always save the images in 1024 for the long side.
It would be good if the settings screen remembered the last image size with the short size being re calculated accordingly.
Best Wishes
Philip L Jackson
Andreas Resch
Hi,
you can update the default settings to always show the 1024px when you start the script. Just open any image, type 1024 into the field with the longer side and click the „Update“ button next to the preset selection dropdown.
Vivek D Warang
Thank you so much………..
Jim Patterson
Hi Andreas,
I just switched to Photoshop CC and I am getting a message I know you are aware of. I copied the 3 files to my scripts folder just as I did for PS CS6, but PS CC tells me to make sure the XML file is in the same directory as the script file. And they are. I can open PS CS6 and the script is there and works fine, but doing the exact same thing in PS CC, it does not work.
Have you heard of this before? Any tips? Thanks!
Jim
Andreas Resch
Hello Jim,
here’s a modified „WebSharpener.inc“ file that tells you where the script and the XML file are supposed to be. Replace the origibal „WebSharpener.inc“ temporarily and check the message box.
https://andreasresch.at/upload/WebSharpener.inc.zip
Let me know if you found a solution.
Cheers,
Andreas
Jim Patterson
Andreas,
Well, that file didn’t fix the problem, but an idea came to me. Recently, I had to install my Nik plugins into both the 64-bit AND the 32-bit versions of Photoshop CC manually. If the plugins weren’t in the folders of both of those, they wouldn’t show up.
So, I copied the three files into the Scripts folder for both the 64-bit and 32-bit versions of PS CC and now it works fine!
I guess the sharpening script files need to be in both locations for it to show up.
Cheers,
Jim
Andreas Resch
Thanks for finding this out for me, Jim.
Bungo
Thanks for such an amazing tutorial……This is the one tutorial I will ever need for sharpening
Pat Callahan
Excellent…works in CC! Thank you Andreas!
Edward Kunzelman
Your introduction states that the script is best suited for web images that are reduced in size. Is the script appropriate for applying to full size images for print?
Andreas Resch
Hello Edward,
unfortunately the script is not intended for print sharpening and will not deliver any satisfying results for these purposes.
Bo Davidsson
I’m not getting any sharpening effect in Photoshop CC but it works fine in CS5. How come?
Andreas Resch
Hi,
no idea. Does the script run at all?
Thilo M.
Thx lot for your effort. I really love this action!
One question: Is it possible to automate the script? I think, you provided a script with automation in your earlier versions. This would ease up batch processing a lot.
Andreas Resch
In the next version there will a separate batch version.
Thilo M.
Hi Andreas,
maybe it’s me but I did not find a batch version for the script – is there a way to conduct bulk editing? I would love to process a whole series at once without having to conduct all the steps manually.
Thx lot in advance!
Andreas Resch
Hello,
for now you can use V0.8 which has a dialogue-less version included.
https://andreasresch.at/upload/WebSharpener_V08.zip
Just edit the parameters at the beginning of the JSX-file labeled „EDIT THESE SETTINGS FOR THE AUTO-RUN“ to your liking and run the script from inside an action using a batch process in Photoshop.
Dimitrios
Excellent work Andreas! Keep going…
Roger Wellman
This is an amazing piece of work and much needed for online display… I would love to hear that you are working on a Lightroom Plug in with similar capabilities?
Andreas Resch
Hello Roger,
unfortunately I have no experience in programming plugins, so a Lightroom version isn’t possible at the moment.
Cosmin Stan
Hello Andreas! Why the script dont save the picture as jpeg not only jpf or jpeg 2000 ? This type of format dont allow me to see the picture and to upload on the internet! Thank you!
Andreas Resch
Hi,
the image stays in Lab mode after the downsizing. You have to convert it to sRGB and will then be able to save it to a wider range of formats including JPG. There’s a action included in the ZIP-file which does this last step.
Andrey
Hello. Excellent script v0.9.7 and v1.0a. Will update in the future? Thank you.
Andreas Resch
Thanks Andrey,
working on V1.0 little by little but spare time is limited at the moment so it will take a while longer.
Andrey
Andreas,thank you very much. Waiting for news…
Andrey
Andreas you have a great script. And you tried this action for resizing and sharpening photos – http://www.uni-vologda.ac.ru/~c3c/plug-ins/c3cimagesize.htm ?
Andreas Resch
Not yet – I will give it a try.
Andrey
..Of course, your script has settings for specific tasks ..
prashant
Hello Andreas,
I’m happy user of the latest version. I have a feeling though that the contrast layer is perhaps not working? The curve needs to be adjusted to the taste. If this is intentional then ok.
Andreas Resch
Hello,
I’m a bit confused. The contrast compensation has no curves – it’s a saturation layer that is switched to Overlay blending mode.
Pat Callahan
Andreas, Any chance of making this work in the CC 2014?
Pat Callahan
I copied the files from cc and pasted to scripts in cc 2014 and it works! Thanks for a wonderful script!
Dong-Key Park
Hello Andreas,
I have installed your Web Sharpener v0.9.7, and it is really amazing. I’ve made a small donation immediately as a token of my appreciation of the wonderful solution.
One issue here. I checked Contrast box and Saturation box, and clicked Update button, and named the new preset, and then clicked the Start button. Resize and sharpen task were performed successfully. I opened next PSD image file, and clicked File>Script>Web Sharpener v0.9.7. I saw Control Panel, but my new preset was not shown in the Presets drop down list. I tried to click „Add Preset“ button this time to register my new preset, but the result was the same as before. FYI, WebSharpener.jsx, WebSharpener.inc, WebSharpener_Settings.xml files are all inside the same Script folder. I don’t know what I did wrong.
Don
Andreas Resch
Hey Don,
this might be an issue with write permissions to the XML-file. Check if you are allowed to write to the file. You can also try to run Photoshop as Administrator (in Windows it’s Right-Click and „Run as Administrator“). Hope this helps.
Dale Pritchett
Andreas,
Thank you for your work. It is an excellent contribution. I installed on CC 2014 and like Jim above, I had to install in both the 32 and 64bit directories to have it work. Now I find that I have the second issue of not being able to update the XML file which is duplicated in both the 32 and 64 bit directories.
Andreas Resch
Did you check the write permissions on the XML-file. You might also want to try running Photoshop as Administrator.
Dale Pritchett
Thanks! That was the problem.
Andrew Losurdo
WOW! For years i have been searching for a web output sharpening solution that actually works and looks amazing. The search is now finally over. I am blown away by the results. Thank you so much! Donated!
D.Bouscarle
Thanks Andreas, awesome action.
Greetings from France.
Matt
Hello, I have a question. The original photo that I have is not 16:9, yet I want to resize it to a 1920×1080 resolution which is 16:9. Is it possible to change the width without it updating the length automatically?
Andreas Resch
Hello,
my script won’t crop an image an you will have to crop the shot to the correct proportions before resizing. But this is best anyway as you can specify what you want to crop and what you want to keep in the shot.
Cheers,
Andreas
Sébastien
Hello,
This is a very useful script. However I find that it is sometimes too much sharpened, and reducing the opacity of the „Lighten“ layer down to 15% is fine. It would be nice if we could specify a different layer opacity for the lighten and the darken layers directly in the interface.
A bonus would be to be able to specify a different radius and gain for each layer. I believe we can go stronger with the darken layer.
Thank you for this nice interface
Andreas Resch
Hello,
you can change the default layer opacity by changing the value in the dialog and then press the „Update“-Button in the Presets section. This will change the opacity in both the lighten and darken section though. Otherwise one should always check the layer transparencies on an image-by-image basis as their values are depending on the content and can vary all the time.
Sébastien
Hello again.
One last improvement would be to duplicate the image into a new document before resizing.
This way, we can keep the original image and have a version for the web.
Thank you
Andreas Resch
Hello,
the image should be duplicated by default. If not, see if the checkbox next to „Duplicate Image“ is checked.
Sébastien
Yes this has worked. Excellent !
Thank you
Greg
HI,
This looks awesome. Is there a way I can just download the action separate tot he script?
Or do they come as a package?
Many Thanks
Andreas Resch
The action is included in the ZIP-file as a seperate file.
Tarun
I get this error with the new script. Entire un zipped folder inside presets/scripts folder.
Make sure the XML settings files is in the same folder as the script.
I also tried renaming it to „Web Sharpener V1.0a” (by default it unzipped as Web Sharpener V1) which was not helpful. I am on photoshop CC2014. Any thoughts?
Andreas Resch
Hello,
sorry – that was my fault. The ZIP files was faulty. Download again and it should be fine now.
Florin
Hello. I have not read all the reviews but there also in a version for Lightroom? You know something similar for Lightroom?Thank you.
Andreas Resch
Sorry,
don’t know anything like that for Lightroom.
Don Park
Whenever I click Update or Add Preset button, then I see Script Alert window saying that XML Settings file must be in the same folder. I downloaded WebSharpener.inc.zip file from https://andreasresch.at/upload/WebSharpener.inc.zip, and copy that to the Web Sharpener V1.0a folder, and then tried to Update or Add Preset, but failed.
The 64 bit Photoshop CC is installed on my PC, and 32 bit version is not installed. So I can’t apply Jim’s solution. There must be a solution for Photoshop CC users like me.
Thanks,
Don
Andreas Resch
Hello,
don’t copy anything over the files from the ZIP file. Just extract it into the scripts folder and leave the folder inside the ZIP file intact.
Danny
Hi Andreas,
Just tried out your new web sharpener which works fine until I try to add a setting to the presets. I get this message: „Make sure the XML settings file is in the same folder as in the script.“ it wont allow me to make any presets. I use PSSC6 and extracted the zip file in the script folder. Thank you for your time.
Danny Laureys
Laureys@live.com
Andreas Resch
Hello,
make sure to keep the folder „Web Sharpener V1.0a“ intact when extracting. Otherwise the script won’t work properly.
Hans
Hi, just tried it out and amazing results so far. Seems to be just what I´ve been looking for.
Many thanks / Hans
Hali
Hi Andreas I love the script so far but I am also getting the “Make sure the XML settings file is in the same folder as in the script.” error when I try to change the default. When I try to make a preset it lets me do it but it doesn’t actually make it. I extracted the zip file in it’s entirety into the presets/scripts folder in PSCC2014 so all the files are intact in the Web Sharpener V1.0b folder within PS. No matter what I do I still get the error, it’s not a show stopper but it would be nice to set up some presets. Thanks!
Andreas Resch
Hello,
if you don’t get an error when opening the script, just when you update or add a preset, then it could be something about write permissions for the file. If the script wouldn’t be able to find the file, you would get an error right when you start the script. File permissions are something the script cannot take care of. Some people said, that they need to run Photoshop as Administrator for things to work.
Stian klo
Hi Andreas! I’ve tried all sorts of different options, but when running the v1.0c script in CC I get this message: „Make sure the XML settings file is in the same folder as in the script.” – v1.0a works as normal, and I’ve tried copying that XML file to the v1.0c folder, but no luck. I unzipped and copied the entire folder and everything should be running smoothly, but I can’t figure out what the hold up is! hopefully you can be of assistance 🙂
Andreas Resch
Hmmm – works fine here. You mustn’t copy the XML file from 1.0a to the 1.0c folder. I thing I’ve changed the structure from 1.0a to 1.0b. So copying 1.0b to 1.0c should be OK. Did you keep the files inside the folder that is included in the ZIp file?
Stian klo
I don’t have v1.0b – can you please link it to me? I did keep all the files in the folder =)
Andreas Resch
Here’s the link to version 1.0b … https://www.andreasresch.at/upload/WebSharpenerV1.0b.zip
Stian klo
thanks alot buddy!
Hali
Thanks so much Andreas. Using it in Adminstrator mode was the key!
Andrey
Thanks Andreas. This script is very valuable.
Michael Greene
Hi Andreas,
This script is not working for me for Adobe CC 2015. It gives me the message ‚make sure the xml settings are in the same folder as the script‘. I tried extracting the zip folder twice to the scripts folder. I double checked and the websharpener.xml is in there – it’s just not working for some reason. Thank you!
Andreas Resch
The script will not work in CC 2015 for now as Adobe changed the underlying structure of Javascript. The dialog should appear though. An XML-error has other reasons. Try to start Photoshop as Administrator or change the write permissions pf the script folder and files.
Maria
Perfect! I think this is what I was looking for. Now I can complete my own script.
Just wanted to say thank you!
Thilo
Hi Andreas,
is there a way to change the default opacity value for the layers in batch mode, especially for saturation compensation – but also darken and lighten? In an older version, this was possible via changing some parameters in one of the files. I don’t see this option now.
Maybe you want introduce a type-in field for values for a later version would be an indea?
btw: The script just great work!
Andreas Resch
Hi,
I’m just working on an update that will address that issue.
Naveen
Thank you for such an awesome script, I’m unable to proceed after i chose target and destination in batch mode, i’m using CS6
Naveen
I do not see Cancel , Default buttons
Andreas Resch
Hello,
it’s hard for me to say if the script works properly unter CS6 as I haven’t installed it any more. Maybe try one of the older script versions and see if it works. https://www.andreasresch.at/upload/WebSharpenerV1.0b.zip or https://www.andreasresch.at/upload/WebSharpenerV1.0c.zip
Alessandro
Hi Andreas,
after i’ve unzipped the zip file into the C:\Program Files (x86)\Adobe\Adobe Photoshop CS5.1\Presets\Scripts folder i lunch PS and when i try to lunch the script Web Sharpener V1.0d PS tell me „Make sure the XML settings file is in the same folder as the script“. I verified the WebSharpener_Settings.xml is really in the folder.
So the script doesn’t start functioning.
Andreas Resch
Hi,
maybe you haven’t got write permissions to the file. Try to run Photoshop as an administrator and see if it works.
Light search
How is this install into Mac computer? Thanks
Andreas Resch
Like under Windows you have to find the Scripts/Presets folder in the installation folder of Photohop. Extract the Zip file there.
christian
Hi, Andrea, I have the Photoshop installed from Adobe Creative Cloud and there is no Photoshop instalation folder where to extract the zip. files. Can you help me? Thanks,
Andreas Resch
If you’re on Windows, right-click on the the start icon of Photoshop and go to bottom-most entry (must be so something like settings or preferences). In the window that pops up you will see the path that Photoshop is installed in.
christian
thx, got it.
John
Wonderful sharpening tool to have in the arsenal! Now I will have to redo all my website pictures with this 🙂 Thanks so much. Will donate to the cause……
Andreas Resch
I’m glad, that you like it and that you have a lot of work ahead of you now 😉
John
Hey Andreas, I am unable to see the buttons to run the script in batch mode. The box ends just above where the buttons should be. I am running CS6 and Windows 10 if that helps any.
Andreas Resch
Hello,
this happens when the screen resolution is too low. Here’s a little workaround. Go into the transparency field of the watermark section. Press the TAB key once followed by the SPACE BAR to start the standard sharpening. Do the same with pressing the TAB key twice to start the second method.
John
Thanks….worked great!
Denis Van Dessoliers
Hi Andrea,
You had a great sharpen software. I hope you support the Mac PC. I like to try it. Please let me know how can I get it. Thanks.
Andreas Resch
It works on Mac too. Just download it – link is above.
Light searchdenis
Hi Andreas,
Sorry to disturb you again. Some how I couldn’t find that link for Mac. The link above was not allow me to open in Mac.
Thanks.
Andreas Resch
Can you download it? It’s a ZIP-file that you need to unpack with some appropriate software.
Light searchdenis
Hi Andreas,
This is the msg I am getting when I open it. I had it in the same folder. Do I have to modify it and How?
„Make sure the XML settings files is in the same folder as the script.“
Light searchdenis
I got it. Thank you. I will try it.
Sebastien
Hello,
I changed the default opacity to 20% for the sharpening layer in the preset. I checked the XML file, the opacity is defined as 2.
It does change the opacity of the basic layer to 20%, but does not change the opacity of the detail layer which is still 25%. A bit too high for me. Is there any way to specify the detail layer opacity (maybe in the XML file) ?
Thank You
Daryl
Hello
Thanks for an amazing script. Just a heads up, on latest OS X, El Capitan running PS CC 2015, if you try adjust the opacity of the sharpening layers using the slider, PS crashes.
Andreas Resch
Hello Daryl,
do you mean the little slider within the script? Unfortunately I don’t have a MAC and can’t check it.
Cheers,
Andreas
Vicki
Andreas,
Thanks for making a web sharpening tool, I recently upgraded to CC 2015 and I can’t figure out how to install to this version. I dragged the „WebSharpener_Settings.xml“ into the scripts folder, restarted PS and located the script and it’s dimmed out. Any help would be great appreciated and a donation in store.
Thanks!
Vicki
Andreas Resch
Hello Vicki,
the „WebSharpener_Settings.xml“ file has to be inside the folder „Web Sharpener V1.0d“ right were all the script files themselves are. Try that. The menu entry shouldn’t be grayed out though. That’s odd.
Cheers,
Andreas
Andreas Resch
If you use the script for single images only, you can also try the panel version of the script which is here … https://www.andreasresch.at/upload/WebSharpenerEP_V1.0_Alpha.zip
ron
Hello Andreas,
I have also problems with the new script.
its running on a Mac with Yosemite and PS 2015 CC
Its says place the XML file in the same folder as the scrips is.
But it is!! ???
The old script runs great so i put it back.
its a very very nice way of sharpening.
Thanks for sharing.
Andreas Resch
Hello,
I can’t speak for MACs ar I work on a PC. You can try the following. Download this file https://www.andreasresch.at/upload/WebSharpener10d_PathAlert.zip, extract the content and replace the original with it. When you run the script, a window will pop up showing you where the XML-file has to be. After resolving the issue, replace the file with the original again. Maybe this helps.
If you use the script for single images only, you can also try the panel version of the script which is here … https://www.andreasresch.at/upload/WebSharpenerEP_V1.0_Alpha.zip
Cheers,
Andreas
Marco
Hello Andreas, i have a problem. I have successfully extracted the file, but when i try to run the script it appears an error pop up
error 48. the file or directory does not exist. line 16.
I have Ps cc 2015 Thanks!
Andreas Resch
Hello Marco,
looks like the file „WebSharpener_Vars_IT.inc“ is missing from the script folder. Make sure, that you extract all the files and keep the folder intact.
Cheers,
Andreas
simone
hello andrea, even to me by the same marco error.
error 48. the file or directory does not exist. line 16.
Andreas Resch
Hello,
it looks like the file „WebSharpener_Vars_IT.inc“ is missing from the script folder. Make sure, that you extract all the files and keep the folder intact. The folder „Web Sharpener V1.0d“ has to be inside the folder „Scripts“.
Cheers,
Andreas
Tony
Is the panel websharpener the same other than batch sharpening? Cannot get the script to work due to same xml issue.
Andreas Resch
The sharpening process is the same.
Mario
Hallo Andreas,
bei mir läuft der Web Sharpener nicht mehr.Habe die neuste Version vom PS CC 2015.5.1.Habe alles korrekt in den Script Ordner kopiert. Wenn ich den Script im PS starten will kommt die Meldung „Die XML-Vorgabendatei muss sich im gleichen Ordner wie das Script befinden“.Aber die Datei habe ich in den Ordner kopiert.An was kann das liegen?
Besten Dank für deine Antwort
Gruss Mario
Andreas Resch
Hallo,
da durch das Update ein neuer Ordner erstellt wurde, musst du die Zugriffsrechte auf diesen Ordner wieder neu setzen, so dass dein User die vollen Rechte hat.
Patricio
Hello Andreas,
I have a problem to install the WS in my Mac. I extract the file and run the script it appears an error pop up:
installation failed: Message: Unable to create folder /Applications/Adobe%20Photoshop%20CC%202015.5/Presets/Scripts/Web%20Sharpener%20V1.0d (Error de E/S.)
Please create it manually and run this script again.
File: ~/Downloads/Web Sharpener Installation/installer.jsx
Line: 117
Error Name: Error
Error Number: 9002 [installer.jsx]
anonymous([Error:Error: Unable to create folder /Applications/Adobe%20Photoshop%20CC%202015.5/Presets/Scripts/Web%20Sharpener%20V1.0d (Error de E/S.)\nPlease
create it manually and run this script again.])
Cheers
Patricio
Andreas Resch
Hello Patricio,
this is an issue with the installer script on MACs sometimes. There’s a workaround …
Inside the ZIP file you will find a folder called „SCRIPT“ in the „ASSETS“ folder. Copy this folder to „/Applications/Adobe Photoshop CC 2015.5/Presets/Scripts/“ and rename it to „Web Sharpener V1.0d“. Everything should work after that.
Cheers,
Andreas
Patricio
Ok Andreas,
It working now.
Cheers
Patricio
Shyamsundar Lakshminarayan
Hi Andreas,
All the sharpened images get converted to 8bit. Is there a way I can enable the 16 bit option and get 16 bit sharpening ?
Please suggest.
Thanks,
Shyam
Mike
Hallo Andreas
Ich hatte bisher v0.8 im Gebrauch und habe nach einer Neuinstallation meines iMac Version 1.0d manuell installiert (Folder SCRIPT nach Presets/Scripts kopiert und umbenannt). Das Skript wird zusammen mit dem Batch-Skript unter Datei angezeigt, bringt beim Aufruf aber den folgenden Fehler: „Die XML-Vorgabedatei muss sich im gleichen Ordner wie das Skript befinden.“.
Die einzige XML-Datei im Folder ist die WebSharpener_Settings.
Ich verwende Photoshop 2015.5.1.
Kannst Du mir weiterhelfen?
Danke und beste Grüsse, Mike
Andreas Resch
Hallo Mike,
hast du den Ordner korrekt benannt? Er muss „Web Sharpener V1.0d“ heißen (mit jeweils einem Leerzeichen nach „Web“ und „Sharpener“). Wenn ja – dann kann es etwas mit den Schreibrechten für die Dateien zu tun haben. Leider bin ich kein MAC-Expert. Aber vielleicht hilft dir was in dieser Art weiter … https://support.apple.com/kb/PH21997?locale=en_US&viewlocale=en_US. Halt mich bitte auf dem Laufenden.
Grüße,
Andreas
Mike
Hallo Andreas
Na, das ist jetzt etwas peinlich … Es fehlte das „V“ im Foldernamen … Alles bestens, super.
Herzlichen Dank und allzeit gut Licht
Mike
Greg Sava
I have been trying to change the preset size from 900 to 1500, following your instructions. It never stays there, always reverts to 900. Any ideas?
Thanks so much for all your work with this script. I love it!
Andreas Resch
Hi Greg,
did you click the „Update“-Button after changing the value? You can open the file „WebSharpener_Settings.xml“ in the Script-Folder with an editor and check if the value for „“ has changed from 900 to 1500. If not, try to edit the value in the editor and save the file.
Hope this helps,
Andreas
Greg Sava
Thanks- yes I did click the update button on several occasions with no effect. I will look for the .xml file and see if that works.
I’ll let you know:)
Greg Sava
Andreas,
I see the problem. The file was in „read only“ mode, and once I allowed access, it changed and the „update“ function also works. So, if someone else comes up with this problem, that is where to check (Properties/security etc.)
arturo nahum
Andreas, is there any way to reduce a bit the limit of 1.5 times the size of the original versus the sharpened one? Sometime I need to output to a 4K 16:9 format and I do not have enough vertical pixels in my pictures.
Thanks in advance
Arturo
Andreas Resch
Hello Arturo,
below that factor, my script doesn’t really make sense. It’s better to use Smart Sharpen or the Camera Raw Plugin for those images instead.
James
Hi Andreas,
Thanks for offering your work for others to enjoy. Do you know how your action compares to the web sharpening built into TK Action panel?
Thanks,
James P
Andreas Resch
Hello James,
I don’t really know how my script compares to Tony’s actions. I’ve never compared them in-depth. But some people prefer Tony’s and some use mine. Maybe a matter of taste. The advantage with mine is, that you can adjust the settings and results I guess.
Michael Madani
Andreas,
This has helped me so much over the last months so thank you for that!
This evening I did run into an issue Web Sharpening an image. After running the regular script to sharpen, my entire photo was blurry and out of focus. Do you have any idea what may be causing this? appreciate any help!
Best,
Mike
Andreas Resch
Hey Michael,
no idea what happened. Maybe you can provide me with the files to check it?
Davide Ferrari
Hi Andreas,
i’m using this tool from a while and never encountered issues.
But, since i’ve changed monitor, the button to start resizing in the batch version disappeared!
Any ideas?
Thanks a lot,
Davide.
Andreas Resch
Hello,
Adobe changed the code about handling image buttons and I can’t fix that. Please start using my panel version of the Web Sharpener instead. It’s more modern and better integrated in the new Photoshop versions. Here’s the link … https://www.andreasresch.at/upload/WebSharpenerEP_V1.0.5_Beta.zip
Hans Forsström
Works wonders, thanks ever so much 🙂
Walter
Something went wrong Andreas.
Walter
i did ad 2 screenshots, her the links to it
https://s26.postimg.org/scyndmufd/screenshot_346.jpg
https://s26.postimg.org/5o4egy6q1/screenshot_347.jpg
Matthew Briggs
Hi Andreas. Your web sharpener tool is so incredibly helpful. Sadly, after updating to Photoshop CC 2018, it didn’t copy the script over, and none of the new jsx install files seem to work. It always presents with Line 238. Anonymous([Error:TypeError: undefined is not an object]). I am trying to use version 1.0.7 Beta.
Is there a way that I can fix this?
Andreas Resch
Hello,
the installation issues with my Web Sharpener should be gone. Just download the script again and try it again.
Have fun,
Andreas
Torben Meldgaard
Hello
Thanks for a great script – my absolute favorite for output sharpening. However, after a recent upgrade to CC2018 the installation fails.
I get:
Line:238
Error Name: Typeerror
Error Number: 21 (installer.jsx)
anonymous ((Error: TypeError: Undefined is not an object))
Hope it is easily fixed.
best regards
Torben
Andreas Resch
Hello,
the installation issues with my Web Sharpener should be gone. Just download the script again and try it again.
Have fun,
Andreas
Terry
Hello Andreas,
Firstly, thanks for a great tool. I have downloaded it a few times now, having had a few computer disasters and whatnot, and use it a great deal. Never had an issue with reinstallation until today. I just installed the update to PS CC 2018 and I can’t install the script. Error message as follows:
Something went wrong!
Installation failed: Message: undefined is not an object
File: ~/WebSharpenerV1.0d/Web Sharpener Installation/installer.jsx
Line: 238
Error Name: TypeError
Error Number: 21 [installer.jsx]
anonymous([Error:TypeError: undefined is not an object])
Please contact andreas@andreasresch.at, thank you.
Am I being a total bunny here or is there a problem?
Thanks
Terry
Hi again Andreas,
An update on my previous email. I have managed to get the script to appear by copying the whole script folder into PS’s Scripts folder (rookie error!). Now I am getting a popup telling me to make sure the XML settings file is in the same folder as the script. It is in the same folder.
??
Thanks, Terry
Andreas Resch
Hello,
sorry for the belated reply – I was on a trip and return just a few days ago.
The installation issues with my Web Sharpener should be gone. Just download the script again and try it again.
Have fun,
Andreas
Max Rau
Hey Andreas,
after the 2018 update the Sharpener is not available anymore in PS and a re-installation always fails even after checking back with your troubleshooting tips.
James
Hi Andreas,
I keep getting this error when clicking on the installed plug-in:
„The „Web Sharpener EP“ extension could not be loaded because it was not properly signed.“
Any ideas?
Cicciobagigio
Is there a workaround for this issue?
Ron
Works fine here!!
I instal de manual version.
I’m very happy your scrips works again many thanks!!
Ron.
Michael Hindman
Hi Andreas
I love using your sharper, been using for some time now. However, when I updated PS last night it completely disappeared. I tried to download it again and the install didn’t happen. What’s worse, is I still have the PS 2017 on my machine and it has disappeared from there as well. Any thoughts or help on this would be amazing. Thanks again for making such a great tool.
Cheers
Andreas Resch
Installation should work fine. Please read throught the comments. There are a few hints in there.
Cicciobagigio
Hi James,
I have the same problem:
„The „Web Sharpener EP“ extension could not be loaded because it was not properly signed.“
How can I solve this problem?
Andreas Resch
Please download the latest version … https://www.andreasresch.at/upload/WebSharpenerEP_V1.0.7_Beta.zip
Eric
Hallo, zunächst Danke für Dein super Tool.
Warum muss das Ausgangsbild 1,5 mal größer sein als das Endresultat?
Kann man die Limitierung irgendwie umgehen oder aufheben?
LG
Andreas Resch
Die Schärfungsprozedur ist für kleinere Bilder nicht effektiv. Da sollte man dann besser die Standardschärfung von Photoshop verwenden.
Carlos Diaz
Hi,I have this problem, Might you help me:
Installation failed: Message: Unable to create folder /Applications/Adobe%20Photoshop%20CC%202018/Presets/Scripts/Web%20Sharpener%20V1.0d (I/O error)
Please create it manually and run this script again.
File: /Applications/Adobe Photoshop CC 2018/Presets/Scripts/installer.jsx
Line: 117
Error Name: Error
Error Number: 9002 [installer.jsx]
anonymous([Error:Error: Unable to create folder /Applications/Adobe%20Photoshop%20CC%202018/Presets/Scripts/Web%20Sharpener%20V1.0d (I/O error)\nPlease create it manually and run this script again.])
Andreas Resch
Hello,
this is a problem with write permissions on your PC. There are some comments here already with suggestions. You can also look into the readme file that comes with the script.
David Heintz
Hello Andreas,
Really like the latest (V1.07) but I think you need some documentation on it – users manual, etc. Rather complex.
Also, seems like you have spent a good amount of time on sharpening actions. Perhaps a panel from you on just sharpening, not for output, or sizing? For example, I have a Nikon D3s, D5, and a Leica Q. Each requires quite a different sharpening approach…
David
Andreas Resch
Hello,
if you are not too much of a perfectionist, simply setting the resolution and starting the script should do the deal. To write a documentation takes too much time for this being a free script. I’ve also move to the panel version meanwhile, so the script will not be updated any more.
You can get the panel version here … https://www.andreasresch.at/upload/WebSharpenerEP_V1.0.7_Beta.zip
mamo
Gerade erst gesehen das es nun eine Panel Version gibt! Grossartig! Wie komme ich an neuste Infos ran? Danke!
David Heintz
Great product! However, I notice the exif information is not coming up when I upload to Flickr, etc. Is that me, or something with the panel?
Thanks…
Patrick
Hi Andreas,
I wanted to install your script but get this message:
Broken installer ! The init.json file is missing… Please get in touch with the original developper.
And „error 54 lign 26 ->throw new Error ();
Didint found another message about this error here…
Thanks for your help
Andreas Resch
Please use the newer panel version. https://andreasresch.at/websharpener_en
Andreas Kolossa
Hallo Andreas,
Erstmal herzlichen Dank für die Neue Version, große Klasse 😉
Ich habe ein Problem, wenn ich einen ganzen im Ordner Fotos verkleinern möchte, kommt zwischen jedem Foto immer eine Script Warnung.
Das Foto kann zb. nur in zwei Schritten verkleinert werden. Dan drücke ich auf OK, beim nächsten Foto stoppt das Script wieder und es kommt eine Scriptwarnung usw.
In Photoshop CC 2019 habe keine Einstellung gefunden um es abzustellen. Weißt du vielleicht was ich da machen kann?
Herzlichen Dank und eine schöne Woche
Andreas Kolossa
Andreas Resch
Hallo, Andreas.
In Moment kann man das nicht deaktivieren. In der nächsten Version ist das dann aber korrigiert. Im Moment kannst du die Werte für Verkleinerugsschritte oder Verkleinerungsfaktor so verringern, dass die Meldung nicht mehr kommt. So sollte es ja eigentlich auch sein. Die Meldung kommt ja nicht ohne Grund.
Jeff
Hi Andreas, i’m having a problem with the logo placement in web sharpener. I’ve got a logo with transparent background sized to the final size of my image with the logo in the bottom left but web sharpener keeps putting the logo in the middle, even when i change the position it doesnt seem to matter. Do you know what i could be doing wrong?
Danny Laureys
Hi I just installed your sharpener, which I downloaded from this site, in Photoshop CC 2019, it works but I also get this message
“ Script alert: with the selected downscale ratio the maximum number of possible downscale step is 2, which is lower than your chosen amount of steps. The downsizing will continue though. Please adjust the amount of steps in the presets.“ I usually down size to 900. I’m not sure what to do? Thank you for your time.
Danny Laureys
Laureys@live.com
Andreas Resch
The panel should always be used on the image at full resolution. If the original image is too small in size, this message will pop up.
Hans gunnar Aslaksen
Hi. Thanks for a great tool! How do you save the image as .jpg? Do you just go to > File > Save as in PS, and choose jpg from there, or do you use the save for web action? I guess yhe script have already done that, so I guess the right thing to do is got to file > Save as, byt just want to be sure 🙂
Andreas Resch
After sharpening I usually adjust the layers of the sharpened image to my liking, flatten the image and us the default „Save as“ command to save the JPG – usually at quality 10 or 11.
Pere
Hi Andreas,
I was wandering if your Web Sharpener could be useful for full size images a well. I mean no downsizing and maybe, depending on the final use of the image, no color space or bit depth conversion. Thanks for your time!
Pere
Andreas Resch
Unfortunately my Web Sharpener will not do a good job on full size image sharpening. There are other plugins/addons for that.
Frantisek
Helo Mr. can you advice me on how to download it on MAC
Andreas Resch
Unfortunately I don’t own a MAC. I will send you a link via email.
Diego Benin
Hello Andreas,
on updated Photoshop (Adobe Photoshop Version: 20.0.7 20191017.r.87 2019/010/17: 1208010 x64) I have this error now:
Error: General Photoshop error occurred. This functionality may not be available in this version of Photoshop. – The command „Convert Mode“ is not currently available.
Andreas Resch
I just tested it with the latest updated and it works fine. You can try the following. Go to your Documents folder and delete the file „WebSharpener_Settings.xml“. After that restart Photoshop.
Adam
Hello, is there a video tutorial explaining/showing what all the settings mean/do? From the descriptions given above there are still a number settings that I’m not sure what exactly they do, when or if I should use them, how to know when to change them, and what effect they will have on the image. Thanks.
Andreas Resch
Unfortunately not. I’m not a good video creator and instructor. Can you let me know which settings you are not sure about? I will see if I can add some text to clarify that.
Kevin
Hi Andreas, thanks for this great tool. I just installed Photoshop 2020 on my iMac and also installed your script. I was excited to start trying it out but unfortunately photoshop gives me a popup window with the following message: “the command ’select‘ is not currently available“. And it automatically ends the script which tells me afterwards that the user cancelled the operation?
I already tried to find out how to solve this but only get answers for actions, not for a script like yours. Could you maybe help with this issue? Thanks in advance!
carlo alberto conti
Hi! Is it possible to apply Sharpening without reducing the size of the image?
thanks!
Andreas Resch
Not with my sharpener. Sorry.
Bevlea
I have been using your sharpener for a couple of years and and recommend it to others. just love it.
But in the last couple of months – myself and another friend have had to resort to doing each image one by one as it will no longer select the source and destination folders – I click on the but it doesnt ’stick‘
Andreas Resch
I’ll check it out. Cheers.
Kathleen Howard
I already have a paypal account but I wanted to use a credit card to make my donation. However, your site does not let me bypass that step.
I can’t use my paypal account to donate because I am stuck out of the country (USA) and it won’t let me put in my local Panama phone number so they can verify it is me.
I would like to get this software, but am stuck in limbo unable to use either pay option.
Andreas Resch
You can get the Sharpener without paying as well – it’s free. Don’t worry about the donation. If you want, you can use the amount you wanted to donate and do something good with.
tiziano
hello andreas congratulations for the things you do.
I’ve been following you for a while. I tried to install your web sharpner but it gives me an error could you help me?
I use photoshop 2019
Andreas Resch
You have to give me some information about the error. Contact me via email – andreas@andreasresch.at
Franklin Jose
Hi Andreas, I hope you’re all right! I used the previous version quite a while ago and with very good results, but, now I want to use version V1.2 I already download it but I have a few questions. 1) Where does Photoshop appear this? 2) How does this run in Photoshop? because in the previous version it runs from script
Xoan Garrido
Thank you for the plugin.
Chris Lawrence
Hi Andre,
Thanks for supply this tool set. Unfortunately I am not able to download for the Window exe. I click on the link and nothing is happening… Suggestions?
Andreas Resch
I just tried it and it seems to work just fine. Maybe there was an issue with my provider.
Alan Helms
Andreas,
I am trying to install your Web Sharpener Extension Panel 1.2 on Adobe Photoshop 2021. I downloaded it and followed the instructions that you included but when I restart Photoshop your panel is not listed under the extensions tab. I have the older 1.0 script. Thank you for producing a quality product.
Andreas Resch
If you have an M1-Prozessor, this will not work for now. Otherwise it should work.
Alexis Jaldin
Hello Andreas
regards from Chile. I have tryied to download the panel, but no works the download 🙁
How much is the value to donate?
regards
Alexis
Andreas Resch
Check for any antivirus-software preventing the download. The donation amount is free to choose.
Mira
Hello! Can I use this with Photoshop 2021?
After installed, where are the files on my computer?
Andreas Resch
Works on the latest versions expect Macs with an M1-Prozessor. Check the description on my website to see where the extension is installed.
Margaret Weir
The download button for your current windows version isn’t doing anything. I can download the older version only.
Andreas Resch
Works for me. Do you have some antivirus or malware checker installed. Sometimes they falsely block websites and downloads.
Jesús
Hello! , i cant download the windows ext.
Regards
Lillian E Rodriguez
Hello, the link to download the mac version is not working for me. I’m using a imac m1 with malware inactive.
Stefano
The download for windows doesn’t work. I try to shut down any firewall or antivirus but nothing happen
Ed Adams
I just tweeted you but found now. I am on a M1 Mac Mini running the apple silcon version. It does not support extensions. I can change it to the Rosetta version which does allow legacy extensions. Do you have a workaround so I can use the universal and still use your extension?
WARWICK ATKINSON
Cannot get the site to download EXE file
Massimo
Sorry for my bad English.
I never apply any sharpening to my raw files when processing in Adobe Camera Raw. I always apply some sharpening afterwards, in Photoshop, to the TIFF Full Res file. Is the Web Sharpener EP enough for photos with web output? Or is a bit of sharpening to the Full Res file also needed?
I would like to understand if this (Full Res sharpening) is already done automatically by Web Sharpener EP.
Loony
It’s an amazing tool. Is it possible to sharpen and keep the file large too?
Alex
Are this Sharpening Panel still compatible with Adobe Photoshop CC Version 21.2 (or latest version…)
Do you still use the same panel, or do you got any new methods…
Andreas Resch
The panel is compatible with the latest version of Photoshop. Just get it from the Adobe Marketplace and it will be fine.
Zach
Hi Andreas! Thank you for all of the work you have put into this. I have the width set to 34800 px, but I’m receiving this error message:
„Error – The image size is too small. The sharpening will be aborted“.
It’s a pretty large pano, so I’m not sure why it’s saying that it’s too small. Any ideas?
Andreas Resch
The final size of the image should be 34800px? IÄm not sure that’s correct. You need to enter the size of the image that you want to have at the end, after downscaling.
sean
is there an offline download available for the latest version?
Aliaume
Hello Andreas, for which reason did the panel stopped converting the image to Srgb. That was such an handy feature and it is a pain to do it manually everytime. Is there a way to put it back ? I have the 8bit toggled on.
Dean
Hallo Andreas, ich habe gerade die Batchfunktion probiert, aller dings bleibt der Zielordner leer
Hello Andreas, I just tried the batch function, however the destination folder remains empty.
thanks
alicia
Hi I keep getting the same error „Error – The image size is too small. The sharpening will be aborted“.
I am trying to size it to 5,200 pixels on the horizontal axis and 3,000 pixels on the vertical axis. and I am getting that error that its too small, doesn’t make sense
Aliaume
Hello Andreas,
First of all, I wanted to say thank you for this awesome. I am using version 2.0.2. Previously, it would automatically convert the image to Srgb. It doesn’t seems to work anymore even though I checked the 8bit box. Any solution to that ? It is particularly use when batch sharpening for my website.
Thank you,
Aliaume
javier
I have installed the Web Sharpener for Photoshop extension, but when I try to apply it after finishing the photograph, it gets stuck, with the box blank, and does nothing. Thanks
Andreas Resch
Hard to say what’s going. I’m always using it on the latest Photoshop releases and I have no issues. So it might be a combination of factors specific to your machine or the way you use your images. Have you used the latest version from the Adobe Marketplace?
Jeff
Error – The image size is too small. The sharpening will be aborted“ PS 25.3.1 – Max size working 1350 px
Andreas Resch
This happens when the original isn’t big enough to make sense of the downscaling algorithm. Images should be at least around 3 times larger than the final result to profit from the sharpener.
Tiago
Hello, Andreas
Great extension, thank you very much!
Is there a way to use it in Affinity Photo?
Andreas Resch
Unfortunately not. My plugin uses Photoshop specific code.